


How to Build a CGM App with Flask, Terra and ChatGPT
Introduction
Terra is an API that delivers wearable data to your applications via Webhooks. In this article, you will learn how to use the Terra API to create a simple CGM app, and how to use ChatGPT to analyze the blood glucose levels.
A CGM app, or Continuous Glucose Monitoring app, tracks glucose levels in real-time, providing users with constant updates and alerts about their blood sugar levels. The app displays this information in an easily understandable format, helping individuals with diabetes manage their condition more effectively by making informed decisions about diet, medication, and lifestyle adjustments.
We will be using Python and Flask to consume data from the Terra Webhook, store it in a database, show it using a ChartJS graph, and then use the OpenAI API to analyze blood glucose levels.
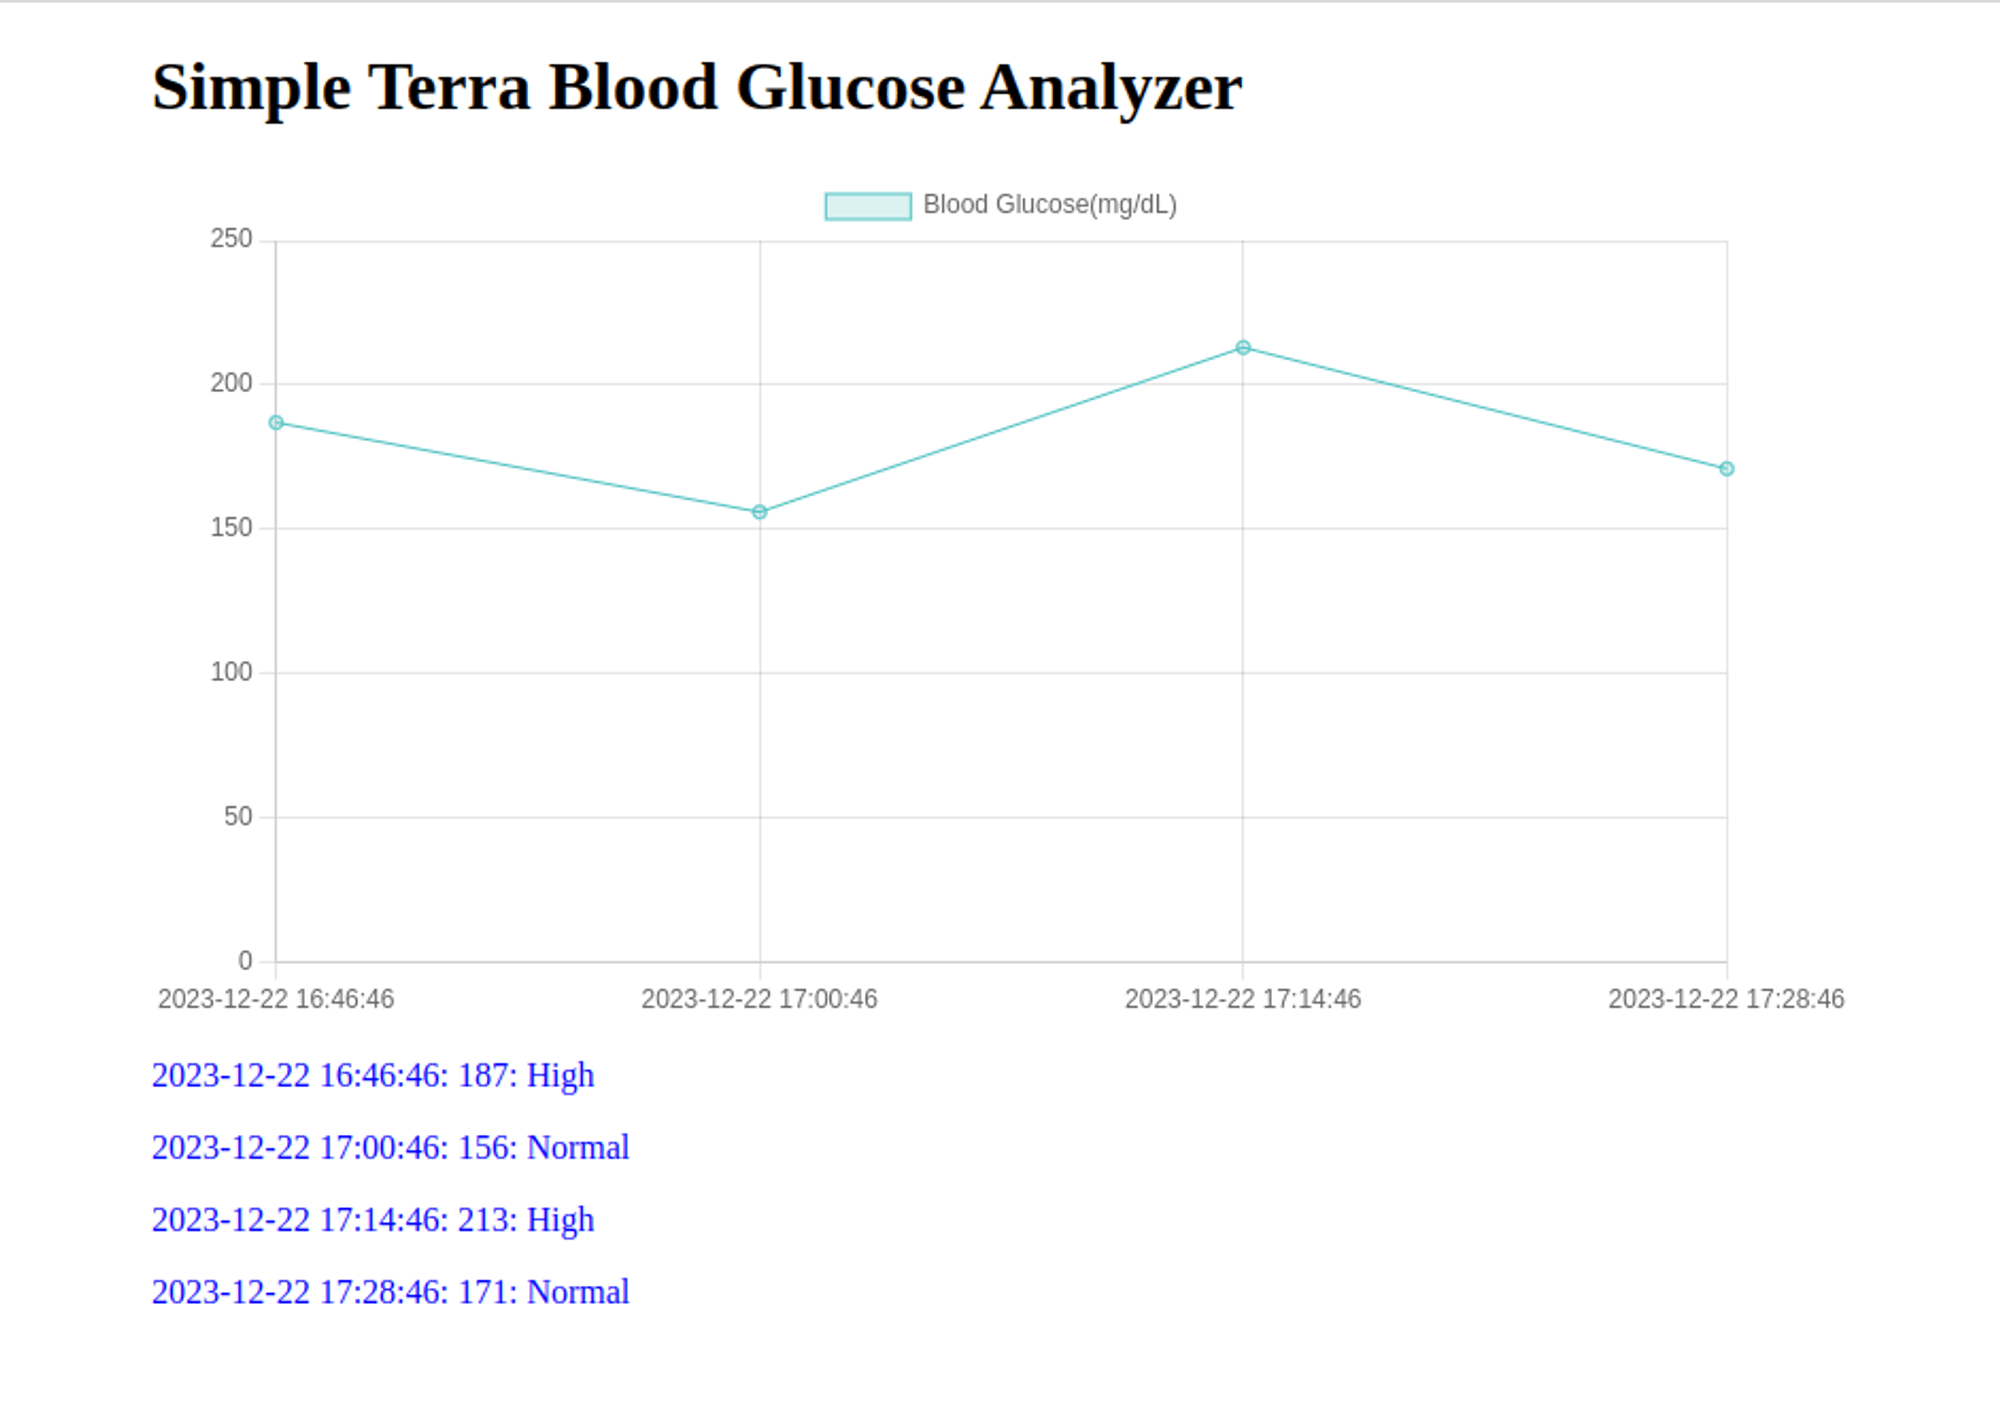
Here is an image of the web application we are going to build:

Step 1 - Obtain Your Credentials from The Terra Dashboard
To communicate with a wearable through the Terra API, you need the following:
- Your API Key
- Your Dev ID
Go to your Terra Dashboard, under Connections, you will find your API Key and Dev ID in the bottom right corner in the API Credentials Popup. They are used in virtually every interaction with the API - keep them safe!
Step 2 - Create a Flask Webhook Consumer and Serve it with Ngrok
Create a virtual environment and activate it:
python -m venv env
source env/bin/activate
Install the necessary packages:
pip install Flask Flask-SQLAlchemy terra-python openai
The terra-python package is a wrapper for the Terra endpoints and models. We'll use it to verify and authenticate incoming webhook data.
Next, create a small Flask app file called app.py:
import logging
from flask import Flask, Response, request, render_template
from terra.base_client import Terra

logging.basicConfig(level=logging.INFO)
_LOGGER = logging.getLogger("app")

terra = Terra(api_key='<API-KEY>',
              dev_id='<DEV-ID>',
              secret='<SIGNING-SECRET>')

app = Flask(__name__)

@app.route("/", methods=["GET", "POST"])
def consume_terra_webhook() -> Response:
    if request.method == 'POST':
        # Get data from the Terra Webhook
        body = request.get_json()

        # Log that the Webhook was recieved
        _LOGGER.info(
            "Received webhook for user %s of type %s",
            body.get("user", {}).get("user_id"),
            body["type"])

        # Just a health check, return 200
        if body["type"] == 'healthcheck':
            return Response(status=200)

        # Verify Terra Signature
        verified = terra.check_terra_signature(request.get_data().decode("utf-8"),
                                            request.headers['terra-signature'])

        # The data is verified
        if verified:
            return Response(status=200)

        else:
            return Response(status=403)

    # Handle GET requests
    if request.method == 'GET':
        return render_template('index.html')

if __name__ == "__main__":
    app.run(host="localhost", port=8080)
Make sure to fill in <API-KEY> and <DEV-ID> with your API key and developer ID. The signing secret will be added later in this article.
This simple Flask web application serves as a webhook endpoint for Terra.
The code performs the following:
- Initializes logging with INFO level.
- Initializes a Terra client with the provided API key, and developer ID.
- Creates a Flask web application instance
app. - Defines a route ("/") that handles both GET and POST requests.
In the consume_terra_webhook() function, you have two conditions, one for handling POST requests and one for GET requests.
If the request is a POST request, this means that the Terra API has sent some data through a Webhook. So, the code does the following:
- Retrieves JSON data from the request body.
- Logs information about the received webhook, including user ID and data type.
- If the webhook type is a "healthcheck" respond with a 200 status.
- Verifies the Terra signature by comparing it with the calculated signature using the
check_terra_signature()method. This will not work for now, as we haven't yet added a signing secret. - In the
if verified:condition, the signature is verified, so we respond with a 200 status for now; you will later modify this part of the code, so that it inserts data into a database. We will also respond with an HTTP 201 status code instead of 200 to signify that a resource was added to the server. - If the signature is not verified, respond with a HTTP 403 FORBIDDEN status.
On the other hand, if the request is a GET request, the code renders an index.html template.
Now, create a templates folder inside your Flask app's directory and create a new index.html file inside it:
<!DOCTYPE html>
<html lang="en">
<head>
    <meta charset="UTF-8">
    <meta name="viewport" content="width=device-width, initial-scale=1.0">
    <title>Blood Glucose Analyzer</title>
    <!-- Add Chart.js CDN -->
    <script src="<https://cdn.jsdelivr.net/npm/chart.js>"></script>
</head>
<body>
    <div style="width:50%; margin:auto;">
        <h1>Simple Terra Blood Glucose Analyzer</h1>
    </div>
</body>
</html>
Save and close the file.
Here, you just display a simple <h1> header. You will later modify this to display a ChartJS graph.
Next Run the application on port 8080:
flask --app app run -p 8080
As Terra cannot send Webhook data to your local development server, you have to expose your server to the Internet using Ngrok. To install it, check out this page.
Once you install Ngrok, create an account, then obtain your authentication token from the Ngrok dashboard. Once you get your authtoken, add it to your Ngrok agent using the following command:
ngrok config add-authtoken <TOKEN>
This will allow you to access some features such as rendering HTML files.
Once you set up Ngrok, use it to expose your Flask application that is currently running on port 8080:
ngrok http 8080
This command will give you a URL under Forwarding. Use your browser to access this URL, you should see your index page.
Note: Copy your Ngrok URL. This is your Server URL, and you will use it to connect to a Terra Webhook in the next step.
Step 3 - Connect a Terra Webhook with Your Server
You will now connect a test wearable with your Flask app.
Note: We will use Dexcom in this demo.
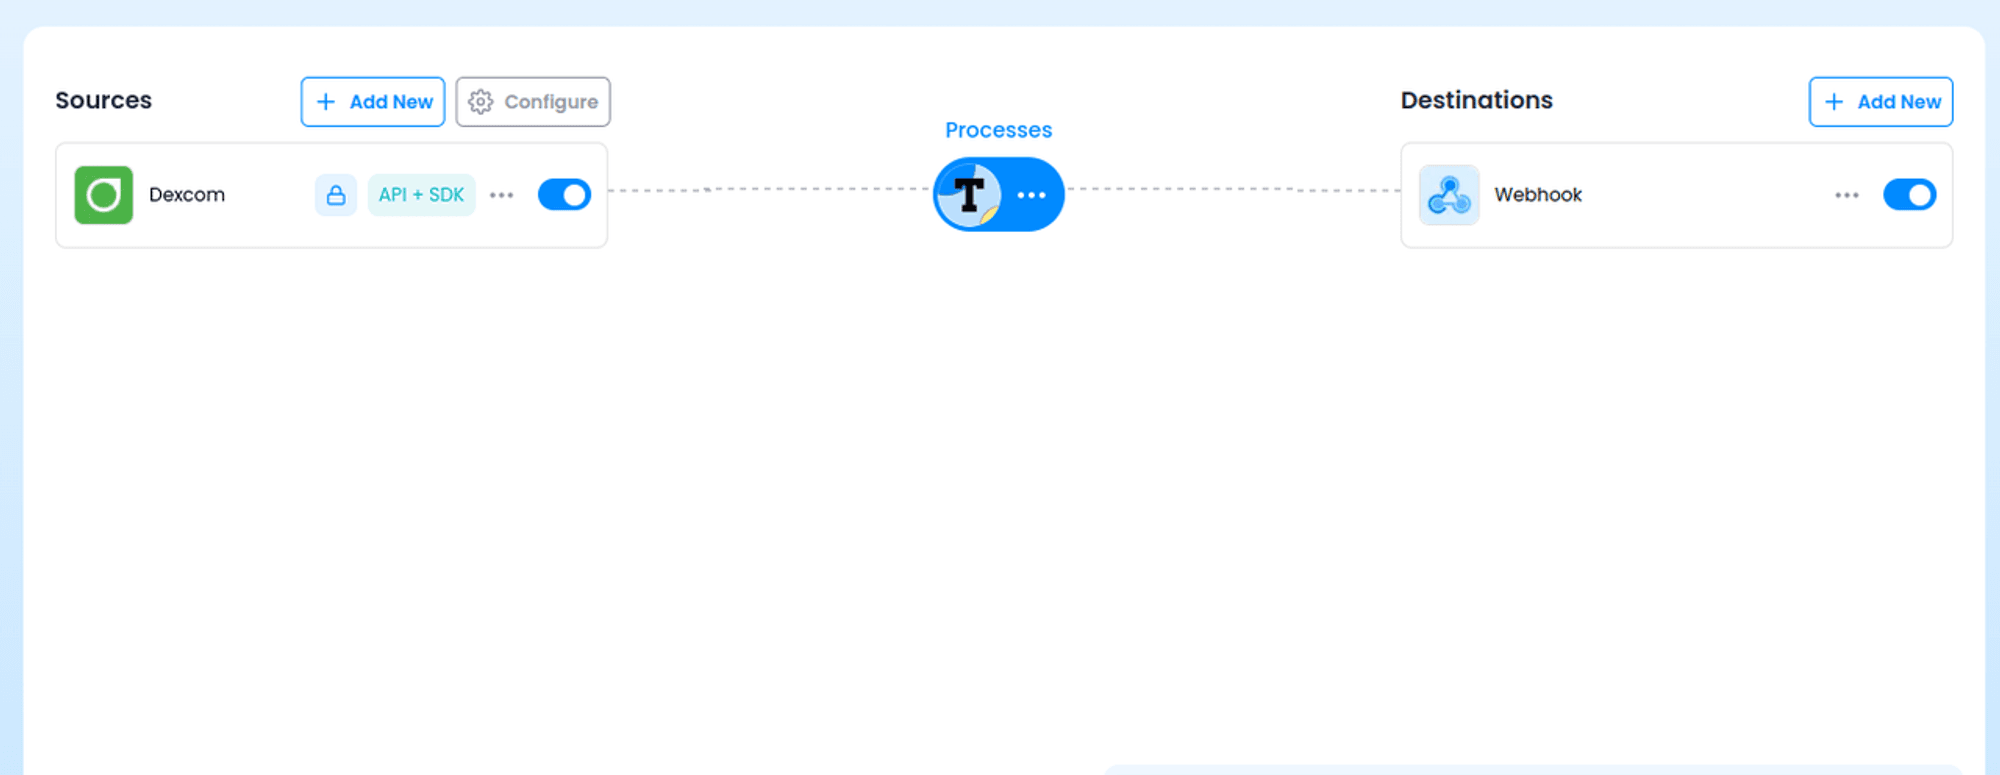
Go to your Terra Dashboard, then in Connections. Under Sources, click Add Sources, and select Dexcom, then Save.
Next, under Destinations click Add Destination, then select Webhook, then Next.
Put your Ngrok Server URL under host.
The Connections dashboard should now look like so:
Now, you need to obtain your Signing secret. Click the three dots to the right of Webhook then Edit.
Copy the Signing secret. This is needed to authenticate and verify Webhook requests.
To use your Webhook's signing secret, modify the secret parameter in your Terra initiation inside your app.py Flask application:
terra = Terra(api_key='<API-KEY>',
              dev_id='<DEV-ID>',
              secret='<PASTE-SIGNING-SECRET-HERE>')
Once modified, remember to rerun your Flask app:
flask --app app run -p 8080
Note: Make sure Ngrok is still running. If you've stopped it and restarted it, your Server URL will change, so make sure to edit the Webhook host in your Terra Dashboard and replace the old Ngrok URL with the new one.
We will now test the Webhook connection. In the Terra Dashboard, go to Tools > Generate > Select Data Source > Dexcom.
Then click on Body, then click Generate test data.
Once data is generated. Click Send to Webhook.
Go back to your Flask server and wait for a few seconds. You should see the following message in the logs:
INFO:app:Received webhook for user <User-ID> of type body
INFO:werkzeug:127.0.0.1 - - [23/Dec/2023 12:14:12] "POST / HTTP/1.1" 200 -
This means you have successfully connected a Terra Webhook with your Flask application and you are receiving data! Next, you'll modify app.py to store the data inside an SQLite database.
Step 4 - Storing Glucose Data in an SQLite Database
Now that you are receiving wearable data from the Terra Webhook, you can use Flask-SQLAlchemy to store this data in an SQL database. We will use an SQLite database in this demonstration.
Open your app.py file and modify it by importing and setting up Flask-SQLAlchemy, then adding a new Glucose database model, so that everything above the @app.route("/", methods=["GET", "POST"]) line looks as follows:
# app.py
import logging

from flask import Flask, Response, request, render_template
from flask_sqlalchemy import SQLAlchemy

from terra.base_client import Terra

logging.basicConfig(level=logging.INFO)
_LOGGER = logging.getLogger("app")

terra = Terra(api_key='<API-KEY>',
              dev_id='<DEV-ID>',
              secret='<SIGNING-SECRET>')

app = Flask(__name__)

app.config['SQLALCHEMY_DATABASE_URI'] = 'sqlite:///app.db'

db = SQLAlchemy(app)

# Database Table for Glucose Samples
class Glucose(db.Model):
    __tablename__ = 'breaths_data'
    id = db.Column(db.Integer, primary_key=True)
    timestamp = db.Column(db.String)
    blood_glucose_mg_per_dL = db.Column(db.Integer)
Save and close the file.
Here, you set up a database URI that will point to an SQLite database called app.db. This database file will be created inside a new instance folder that will be automatically added to your Flask project folder.
You also add a Flask-SQLAlchemy database model that represents a table called Glucose with a column for an ID, a timestamp, and a blood glucose mg per dL value, these last two items are provided to us by Terra.
Next, inside your Flask application folder, with your environment activated, open the Flask Shell to create the database file and Glucose data table:
flask shell
>>> from app import db, Glucose
>>> db.create_all()
>>> exit()
You should see a new app.db file inside an instance folder in your Flask project folder.
Next, modify the if verified condition code in your app.py, where you handle POST requests, from this:
# ...
        # The data is verified
        if verified:
            return Response(status=200)
To this:
# ....
        # The data is verified
        if verified:
            glucose_samples = body['data'][0]['glucose_data']\\\\
                                  ['blood_glucose_samples']

            # Add timestamps & glucose data to a DB
            _LOGGER.info("Adding timestamps and blood_glucose_mg_per_dL to the DB")
            for sample in glucose_samples:
                db_glucose_sample = Glucose(timestamp=sample['timestamp'],
                                            blood_glucose_mg_per_dL=\\\\
                                            sample['blood_glucose_mg_per_dL'])
                db.session.add(db_glucose_sample)

            # Apply changes to the database
            db.session.commit()

            return Response(status=201)
Save and close the file.
Here, you extract the Blood Glucose data from the body variable, which holds the data sent by the Terra API. You Log the database insertion, then loop through the provided samples and insert each timestamp and its corresponding glucose sample into the database session.
Finally, you call db.session.commit() to apply changes to the database, then respond with an HTTP 201 status code.
The full file should now be like this:
# app.py
import logging
from flask import Flask, Response, request, render_template
from flask_sqlalchemy import SQLAlchemy

from terra.base_client import Terra

logging.basicConfig(level=logging.INFO)
_LOGGER = logging.getLogger("app")

terra = Terra(api_key='<API-KEY>',
              dev_id='<DEV-ID>',
              secret='<SIGNING-SECRET>')

app = Flask(__name__)

app.config['SQLALCHEMY_DATABASE_URI'] = 'sqlite:///app.db'

db = SQLAlchemy(app)

# Database Table for Glucose Samples
class Glucose(db.Model):
    __tablename__ = 'breaths_data'
    id = db.Column(db.Integer, primary_key=True)
    timestamp = db.Column(db.String)
    blood_glucose_mg_per_dL = db.Column(db.Integer)

@app.route("/", methods=["GET", "POST"])
def consume_terra_webhook() -> Response:
    if request.method == 'POST':
        # Get data from the Terra Webhook
        body = request.get_json()

        # Log that the Webhook was recieved
        _LOGGER.info(
            "Received webhook for user %s of type %s",
            body.get("user", {}).get("user_id"),
            body["type"])

        # Just a health check, return 200
        if body["type"] == 'healthcheck':
            return Response(status=200)

        # Verify Terra Signature
        verified = terra.check_terra_signature(request.get_data().decode("utf-8"),
                                            request.headers['terra-signature'])

        # The data is verified
        if verified:
            glucose_samples = body['data'][0]['glucose_data']\\\\
                                  ['blood_glucose_samples']

            # Add timestamps & glucose data to a DB
            _LOGGER.info("Adding timestamps and blood_glucose_mg_per_dL to the DB")
            for sample in glucose_samples:
                db_glucose_sample = Glucose(timestamp=sample['timestamp'],
                                            blood_glucose_mg_per_dL=\\\\
                                            sample['blood_glucose_mg_per_dL'])
                db.session.add(db_glucose_sample)

            # Apply changes to the database
            db.session.commit()

            return Response(status=201)

        else:
            return Response(status=403)

    # Handle GET requests
    if request.method == 'GET':
        return render_template('index.html')

if __name__ == "__main__":
    app.run(host="localhost", port=8080)
To test that this new added code works, go back to the Terra Dashboard, generate new data, then click Send to Webhook.
Note: You may need to restart your Flask server.
You should see the following two lines in your Flask server logs:
INFO:app:Adding timestamps and blood_glucose_mg_per_dL to the DB
INFO:werkzeug:127.0.0.1 - - [23/Dec/2023 12:19:37] "POST / HTTP/1.1" 201 -
With the wearable data now stored inside our database, we can modify our Flask application and use ChartJS to add a graph that showcases glucose levels.
Step 5 - Adding a CGM Graph with ChartJS
To display the CGM graph, we will modify the part of code that handles GET requests.
Open app.py, then add a datetime import and a new date_time_format() function above the @app.route("/", methods=["GET", "POST"]) line.
import logging
from datetime import datetime

from flask import Flask, Response, request, render_template
from flask_sqlalchemy import SQLAlchemy

from terra.base_client import Terra

# ...
# ...
# ...

# Function to format timestamps to '%Y-%m-%d %H:%M:%S'
# (Makes the ChartJS graph easier to read)
def date_time_format(timestamp):
    return datetime.fromisoformat(timestamp[:-6]).strftime('%Y-%m-%d %H:%M:%S')

@app.route("/", methods=["GET", "POST"])
# ...
Note: The rest of the code is omitted and referenced as # .... The date_time_format() function will be used to make timestamps easier to read.
Next, modify the GET request handler from this:
    # Handle GET requests
    if request.method == 'GET':
        return render_template('index.html')
To this:
    # Handle GET requests
    if request.method == 'GET':
        # Get the latest 10 glucose samples from the database
        latest_glucose_samples = Glucose.query.order_by(
                                 Glucose.timestamp.desc()) \\\\
                                 .limit(10).all()[::-1]

        # Extract timestamps & make them readable
        timestamps = [date_time_format(s.timestamp) for s in latest_glucose_samples]
        # Extract blood_glucose_mg_per_dL values
        blood_glucose_mg_per_dL  = [s.blood_glucose_mg_per_dL for s in latest_glucose_samples]

        return render_template('index.html',
                               blood_glucose_mg_per_dL=blood_glucose_mg_per_dL,
                               timestamps=timestamps)
Here, you get the latest glucose samples from the database, extract timestamps and make them readable, then extract glucose values. You then pass these two extracted values to the index.html template.
To display the glucose data you just passed, open the index.html template and add the following <canvas> tag and <script> tag. So that the <body> contents look as follows:
<body>
    <div style="width:50%; margin:auto;">
        <h1>Simple Terra Blood Glucose Analyzer</h1>
        <canvas id="barChart"></canvas>
    </div>
    <script>
        document.addEventListener('DOMContentLoaded', function () {
            var ctx = document.getElementById('barChart').getContext('2d');
            var myChart = new Chart(ctx, {
                type: 'line',
                data: {
                    labels: {{ timestamps | tojson | safe }},
                    datasets: [{
                        label: 'Blood Glucose(mg/dL)',
                        data: {{ blood_glucose_mg_per_dL | tojson | safe }},
                        backgroundColor: 'rgba(75, 192, 192, 0.2)',
                        borderColor: 'rgba(75, 192, 192, 1)',
                        borderWidth: 1
                    }]
                },
                options: {
                    scales: {
                        y: {
                            beginAtZero: true
                        }
                    }
                }
            });
        });
    </script>
</body>
This new ChartJS code generates a line chart with the provided timestamps and respiration values.
To test out the application, make sure your Flask server is running, and use your browser to access your Ngrok Server URL. You should see a new line chart for blood glucose levels.
Next, you'll add a new feature using AI, and provide a blood glucose analysis.
Step 6 - Adding a Glucose Analysis using the OpenAI API
We will now use the OpenAI API (also known as ChatGPT API) to provide a glucose analysis.
Inside your Flask project, open a new file called gpt.py then add the following code to it:
# gpt.py
import os
from openai import OpenAI

client = OpenAI(
    api_key=os.environ.get("OPENAI_API_KEY"),
)

def ask(question):
    completion = client.chat.completions.create(
    model="gpt-3.5-turbo",
    messages=[
        {"role": "system", "content": """
         You are a cgm app that analyzes blood glucose samples.
         You provide brief straightforward analysis with minimal, to-the-point,
         and concise information on whether a sample is at normal levels or not.
         Your answer should be in safe HTML code inside one <div>,
         with pretty blue CSS styling.
         Use the following template:
         [timestamp] | [blood glucose level] | [output]
         The output should be one of: 'Normal', 'Low', 'High'.
         """},
        {"role": "user", "content": question}
    ]
    )

    return completion.choices[0].message.content
Here, you set up an OpenAI client, passing your OpenAI API key as an environment variable.
In the ask() function, you set up a question that essentially provides a glucose analysis in HTML, which you'll later display in your index.html template.
Now, set your Open API key in an environment variable.
For Linux & MacOS:
export OPENAI_API_KEY='your Open API key'
For Windows:
set OPENAI_API_KEY='your Open API key'
Next, inside your app.py file, add a gpt import at the top:
import logging
from datetime import datetime

from flask import Flask, Response, request, render_template
from flask_sqlalchemy import SQLAlchemy

from terra.base_client import Terra

import gpt
Then use the gpt.ask() function in the part of code where you handle GET requests, just before you render the index.html template, and pass the answer to this same template:
        # Ask ChatGPT to analyze glucose levels
        glucose_analysis = gpt.ask(f"""Analyse the following data:
                            Timestamps: {timestamps},
                            Blood Glucose (mg/dL): {blood_glucose_mg_per_dL},
                            """)

        return render_template('index.html',
                               timestamps=timestamps,
                               blood_glucose_mg_per_dL=blood_glucose_mg_per_dL,
                               glucose_analysis=glucose_analysis
                               )
Here you ask ChatGPT using the ask() function to provide a glucose analysis for each timestamp.
Next, modify your index.html template to display the glucose analysis. To do so, add a {{ glucose_analysis | safe }} line below the canvas:
    <div style="width:50%; margin:auto;">
        <h1>Simple Terra Blood Glucose Analyzer</h1>
        <canvas id="barChart"></canvas>
        {{ glucose_analysis | safe }}
    </div>
With this, you should see glucose analysis below the glucose chart.
Conclusion
Congrats! You've learned how to use the Terra API to make a CGM app.
To learn more about the awesome things you can build with Terra, check out the following pages: